
Are you facing the issue of how to fix an upside-down display on your generic TV? You’re not alone! This problem is quite common in off-brand or non-OEM TV models. In this post, I’ll walk you through the simple steps to correct this issue, plus I’ll share a bit about how I ended up swapping parts between two TVs to get the best of both. Let’s dive in!
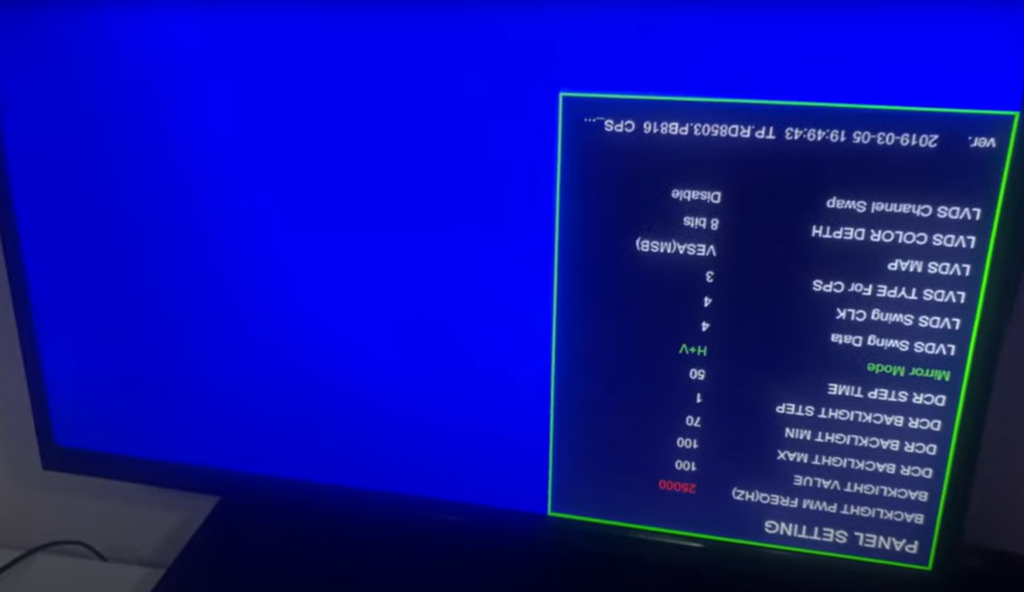
Table of Contents
Step-by-Step Guide to Fixing the Upside-Down Display
First things first, if you’re seeing your display upside-down, there’s a straightforward fix. Here’s what you’ll need to do:
- Access the Menu: On your TV remote, press the Menu button. (If your TV’s display is already upside-down, don’t worry—you’ll still be able to navigate through it.)
- Enter the Hidden Menu: Press the following sequence on your remote: 1-1-4-7. This should open a hidden settings menu, which is often where these generic models hide display options.
- Navigate to Panel Settings: Use your arrow keys to find the Panel Settings option in the hidden menu. Within this section, look for a setting called Mirror Mode or something similar.
- Adjust the Mirror Mode: Once you locate the mirror setting, use the left or right arrows to adjust it until your display flips to the correct orientation. You may need to press the button a few times to cycle through the available display modes.
And that’s it! Your display should now be showing right-side up.
This video elaborates the whole process, watch now and do not forget to SUBSCRIBE!
SUBSCRIBE NOW to our YouTube channel!!!
Fix an Upside-Down Display -Why it Worked for Me
So why did I end up in this situation? Here’s the backstory: I had two TVs, each with its own unique problem. One had a great screen but faulty HDMI ports, and the other had functioning HDMI ports but a damaged screen. Instead of tossing them out, I decided to swap components and create a working setup.
To swap the panels, I took out the PCB (the main board) from the back of the TV with the working HDMI ports. If you’re thinking of doing something similar, here are a few quick tips:
Take Photos of the Cables: Before removing any parts, take a picture of the cable connections to make reassembly easier. Some connectors are designed to only fit one way, but it’s better to have a visual reference.
Check for Alignment Marks: Certain connectors have alignment marks, which help ensure they’re connected correctly. Look out for these markings on the LVDS port and other main connectors.
Why Generic TVs Can Be a Good Option
One benefit of these generic TVs is that their panels are typically separate from the screen casing. This means you can sometimes replace just the panel if the screen is still in good shape. Many of these parts are available online if you’re willing to hunt around. For example, you can find replacement panels on sites like Ali Express.
Final Steps and Testing
Once the components were swapped, I turned the TV off and back on to confirm everything was working. And yes—success! The TV’s display was upright, and the HDMI ports were functioning.
So, if you’re struggling with a similar issue, consider this quick fix before spending on a new TV. You might just save yourself some cash and enjoy the satisfaction of a DIY repair. I added the YouTube video elaborating this whole process above, if you not subscribed to the channel, kindly consider SUBSCRIBING NOW!
Also, if you are into video creation, you might be interested in a post like –Essential guide to choosing the right camera for your project.
Thanks for reading! If you found this guide helpful, feel free to share it, and happy troubleshooting!
There’s a quality in your writing that transcends the typical bounds of literature. It doesn’t simply convey ideas — it invites the reader to explore them from within, to sit with them in silence and feel their deeper meanings settle. This is the sort of writing that not only informs, but transforms. You’ve managed to make something as ordinary as words into a space where one can feel truly alive.